What is transparency?
Digital transparency is more complex than real life transparency. In addition to letting light through —having more or less "opacity"— a digital object can show what is behind it in several ways, each one defined by a different numerical algorithm.
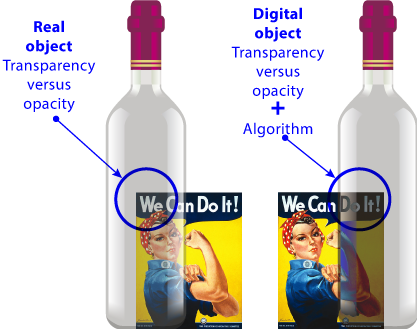
For example, a digital object can have "50%" or "27%" opacity, and besides "Multiply" or "Overlay" algorithms applied.
Digital transparency implies the blending of an object with whatever is behind it. Therefore, each transparency algorithm is a "blending mode" and transparency is a quality of digital objects that has two attributes:
- "
Opacity" - "
Blending mode"
Warning: When we grade a transparency, what we grade is its opacity, not the algorithm it has applied (which we can only change for another one).
Stacking order is essential
Transparency always works from top to bottom, like in a stack of objects. The pixels of the upper object modify the result (depending on their opacity and blending mode). The pixels of the lower object do not modify anything above, although in many cases that might be the appearance.
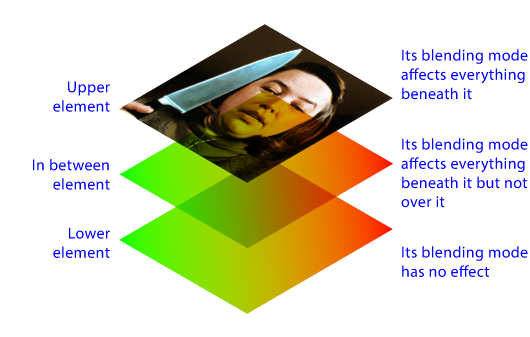
If there is any object under a transparency, the same rule applies: Higher objects apply their blending modes (algorithms and opacity) downwards, not upwards.
Warning: Any object can have a blending algorithm or blending mode applied, but if it has no element behind, this algorithm will have no effect and the object will appear "normal", whatever blending mode it has. In the other hand, the opacity of an object is always displayed, no matter what is behind it. In PDF format, a page ("the background") never has any opacity or blending mode.
The algorithms or fusion modes
In graphic design, blending modes appeared in 1994 with the introduction of layers in Adobe Photoshop. The PDF format incorporated layers and blending modes in level 1.4 (released at the same time as Acrobat version 5.0, in 2001). PDF standards for printing allow the use of live transparencies from PDF/X-4:2008 (The explanations on this page deal with the use of transparencies and blending modes in PDF format).
- Standard modes: These are the 17 blending modes supported in PDF format: Normal, Compatible, Multiply, Screen, Overlay, Darken, Lighten, Color Dodge, Color Burn, Hard Light, Soft light, Difference, Exclusion, Hue, Saturation, Color and Luminosity. All of them are present in Enfocus PitStop.
- Non-standard modes: Some programs have some additional blending modes. All of them are considered "non-standard modes" (these are the ones in Adobe Photoshop in its latest versions): Disolve, Linear burn, Darker color, Linear dodge, Lighter color, Vivid light, Linear light, Pin light, Hard mix, and Divide.
Blending colour spaces
When a program blends colours it must do the calculations in some colour space, which is called "blending colour space".
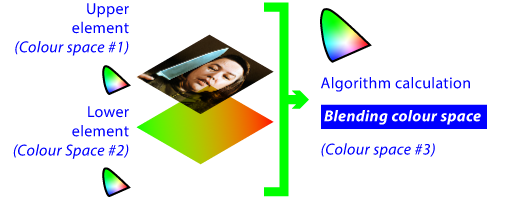
It does not have to be the same colour space or profile as the objects' that participate in the same transparency. The program always knows which one to use because it is either explicitly specified in the transparency, or it is inherited from some higher-level object or group (e.g. the page's).
Not all colour spaces can be used as a blending colour space. The modes supported in PDF format are:
- Device colour spaces: "
DeviceGray", "DeviceRGB" and "DeviceCMYK". - Calibrated spaces: "
CalGray" y "CalRGB". - Profiles with an ICC profile: "
ICCBased"
Warning: No form of Lab can be used.
In addition to the blending colour spaces of each transparency group, in the PDF format, each page has its own one.
Transparency groups
Each set of objects participating in a transparency is a "Transparency Group". There can be several transparency groups on a page, each with their individual opacities, colour profiles and transparency blending spaces.
Warning: An obvious recommendation of the standards is that all blending colour spaces should be unified in the same document or, at least, on the same page.
The behaviour and parameters of transparency groups, within themselves or with respect to other page elements, is a complex subject beyond the general explanation that this page is, so we will not elaborate more on it.
Other transparency elements
In addition to these blending modes and transparency groups, masks of various types exist within a PDF. All these masks can have more or less opacity and their own blending mode with respect to the element they mask.
In a PDF, when the masking element is a pixel object, this is called a softmask, where darker pixels mask more than lighter pixels. This allows a gradation in masking that is not possible with vector elements such as clipping paths.
The use of a softmask implies transparency, as the opacity of the masked object won't be "100%", at least in some areas.
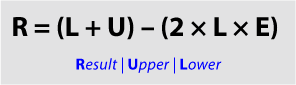
Blending modes
This is the list of the standard fusion modes in the PDF format. With the exception of the "Normal" and "Compatible", the next eleven modes are called "separable modes" because each channel is treated separately. The last four are called "non-separable" because the colour data of each pixel is considered as a whole and each channel cannot be treated separately.
The normalisation of colour data
Most objects have their colour data defined in three channels of 1 byte (8 bits) each (r, g and b). The "separable" blending mode algorithms need to transform the format of this data to values between "0" and "1". This alteration is called "normalisation".

Normalisation consists in converting the data from values from "0" to "255" to values between "0" (the minimum) and "1" (the maximum). This is done by dividing the byte value by 255 (rounding to the nearest value). Once the blending algorithm is applied, the values are normalised back (or denormalised) by multiplying each channel by 255, which returns them to values between "0" and "255".
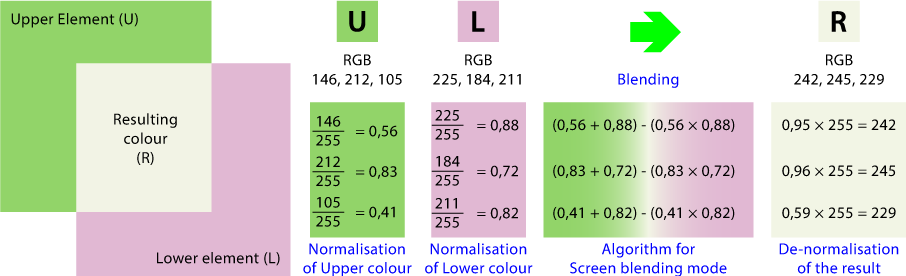
Above, we can see an example of how this normalisation and denormalisation is applied to blend two colours in Screen transparency mode.
Warning: When there are values larger to 1 byte or there are more channels, the normalisations are adapted accordingly. In some cases, this adaptation is complex.
Normal
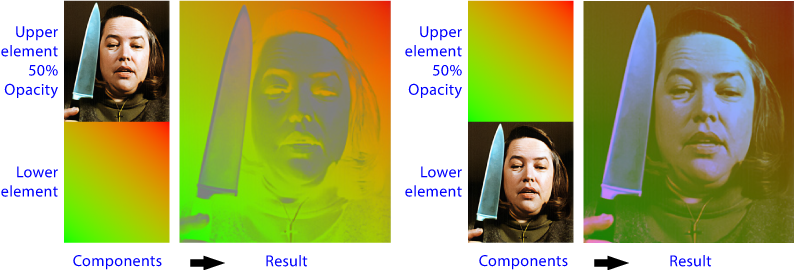
This blending mode is really the absence of any algorithm. Only the pixels and paths of the Upper element are visible.
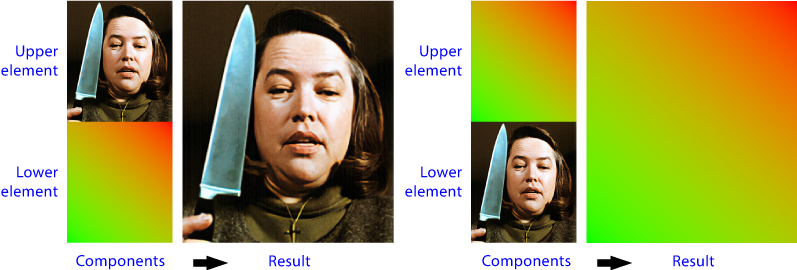
This blending mode is the default mode of any object.
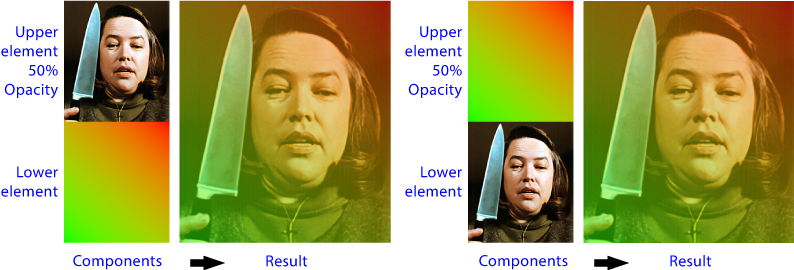
If the opacity is changed, the appearance is very different depending on the stacking order.
Compatible
This is an obsolete mode which, in principle, functions as "Normal". It is not intended for use and it is preserved only for backwards compatibility. It is originally related to some overprinting problems and level 1.3 of the PDF format. Its presence or use may cause some unexpected results.
Multiply
In this blending mode, each of the channels is treated separately. The algorithm obtains the Resulting colour by multiplying the values of the Upper and Lower pixels in each channel (the values are normalised and denormalised).
Because they are normalised, the resulting colours are always smaller (i.e. darker) than the colours that make up the blending. Any blend with a black object (value "0") on top produces black. Any blend with a white object on top (value "1") leaves the lower colour unchanged. The blend mode that produces the opposite effect is "Screen".
Because of its appearance, many users tend to confuse its effect with that of overprinting.
The stacking order does not matter if the opacity of the top object is set to ‘100%’, but if the opacity is changed, the effect is very different depending on the stacking order.
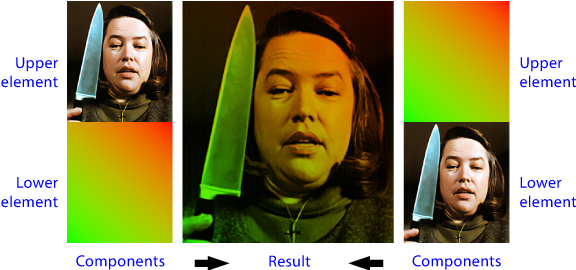
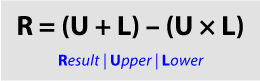
Screen
In this blending mode, each channel is treated separately. The algorithm inverts the normalised value of the components and then inverts the result (the formula presented here is the simplification of that (the values are normalised and denormalised).
The resulting colour is bigger (i.e. lighter) than the colours making up the blending. Any blend with a white Upper object (value "1") produces white. Any blend with a black Upper object (value "0") leaves the Lower colour unchanged. The blend mode that produces the opposite effect is "Multiply".
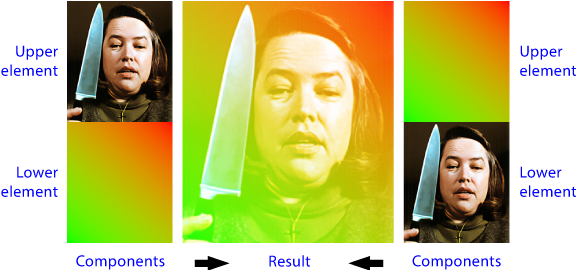
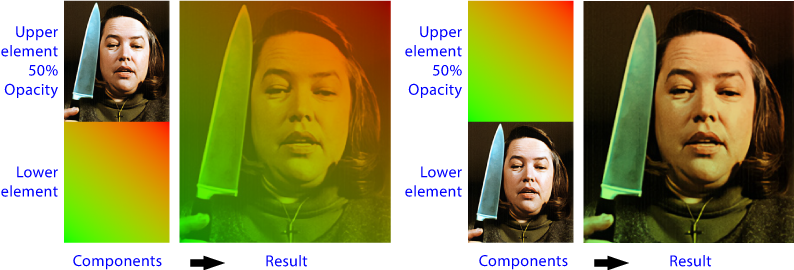
The stacking order does not matter if the opacity of the Upper object is set to "100%".
But if the opacity is changed, the effect is very different depending on the stacking order.
Darken
In this blending mode, each of the channels is treated separately. The algorithm leaves the smaller (i.e. darker) value of the two colours, Upper and Lower, as the Resulting colour (the values are normalised and denormalised).
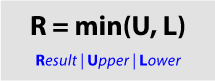
Any blend with an Upper black object (value "0") produces black. Any blend with a white upper object on top (value "1") leaves the Lower colour unchanged. The blend mode that produces the opposite effect is "Lighten".
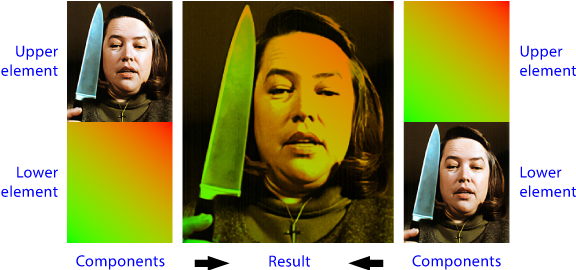
The stacking order does not matter if the opacity of the Upper object is set to "100%".
But if the opacity is changed, the effect is very different depending on the stacking order.
The opposite fusion mode is "Lighten".
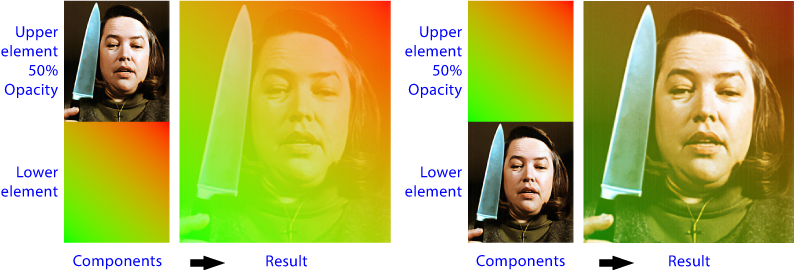
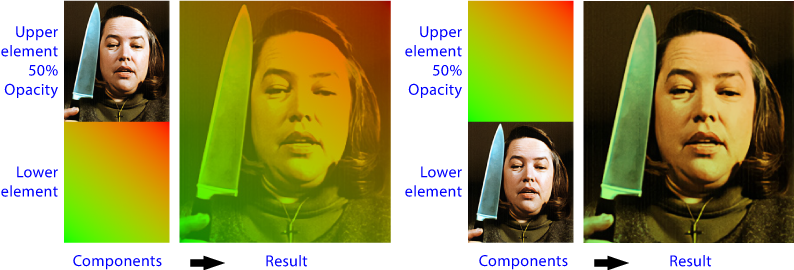
Lighten
In this blending mode each of the channels is treated separately. The algorithm leaves the higher (i.e. lighter) value of the two colours, Upper and Lower, as the Resulting colour (the values are normalised and denormalised).
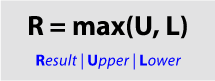
Any blend with a white Upper object (value "1") produces white. Any blend with a black Upper object (value "0") leaves the Lower colour unchanged. The blend mode that produces the opposite effect is "Darken".
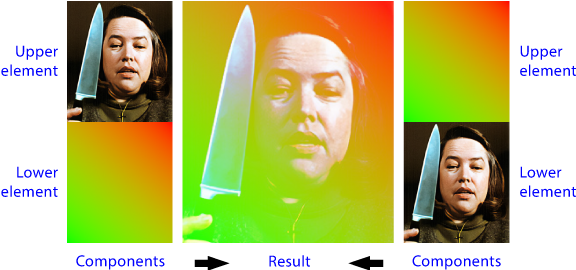
The stacking order does not matter if the opacity of the Upper object is set to "100%".
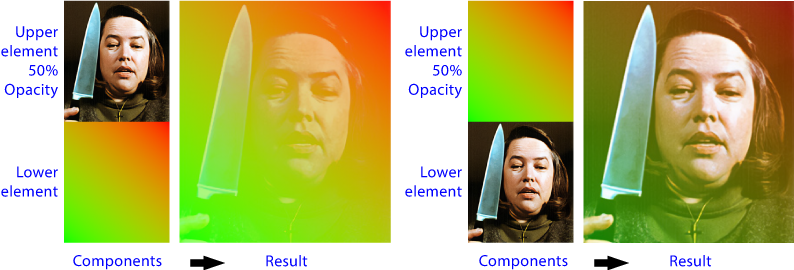
But if the opacity is changed, the effect is very different depending on the stacking order.
Overlay
In this blend mode each of the channels is treated separately. The algorithm can be understood as a combination of "Multiply" and "Screen" depending on the value of the Lower component. If the Lower value is dark (less than "0.5"), "Multiply" is applied; if the lower value is light (greater than "0.5"), "Screen" is applied.
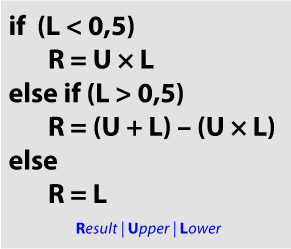
This mode implies an increase in contrast. As in "Hard light" and "Soft Light" modes, if the Upper colour is a medium neutral value (i.e. all components are "0.5"), it is as if it did not exist and the Lower colour is the Resulting colour.
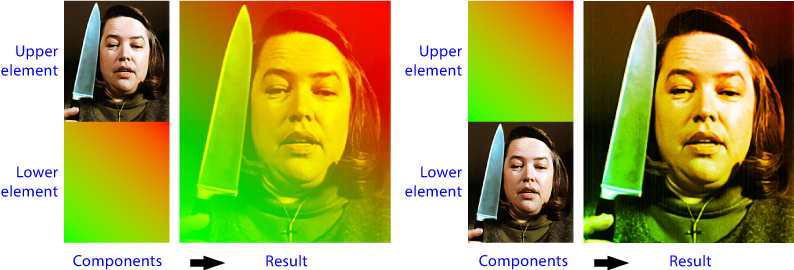
The difference with the "Hard light" mode, which can be understood as its complementary, is that "Hard light" uses the values of the Upper pixels, while "Overlay" uses the values of the Lower pixels.
Hard light
In this blending mode each channel is treated separately. The algorithm can be understood as a combination of "Multiply" and "Screen" modes depending on the value of the Upper component. If the Upper value is dark (less than "0.5"), "Multiply" is applied; if the Upper value is light (greater than "0.5"), "Screen" is applied.
This mode increases the contrast. As with "Overlay" and "Soft Light", if the Upper colour is the neutral middle value (i.e. all components at "0.5"), it is as if it did not exist and the Lower colour is the Resulting colour.
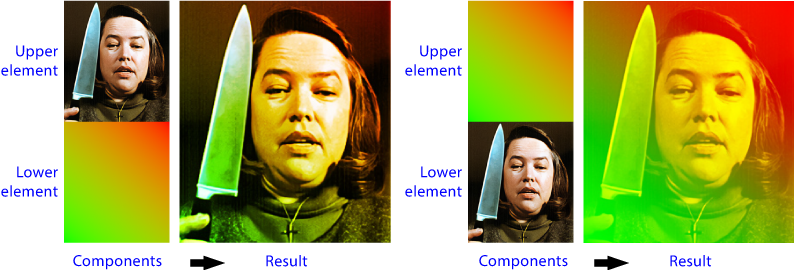
The difference with the "Overlay" mode, which can be cosidered its complementary, is that "Hard light" uses the values of the Upper pixels, while "Overlay" uses the values of the Lower pixels.
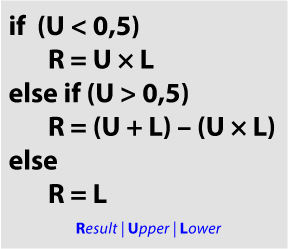
Soft light
In this blending mode, each of the channels is treated separately. The algorithm is complex and has several implementations depending on the software (the one shown here is the one used in PDF format).
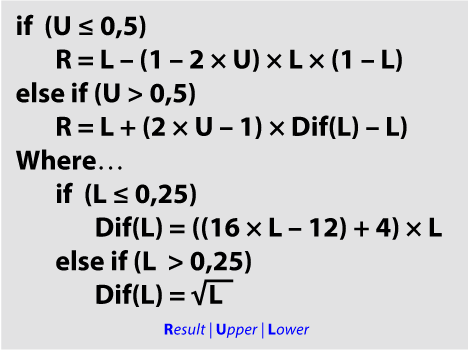
The Result is similar to "Overlay" but with less contrast. Its effect is supposed to be similar to applying the Upper pixels as a soft, diffuse light to the Lower pixels (hence its name).
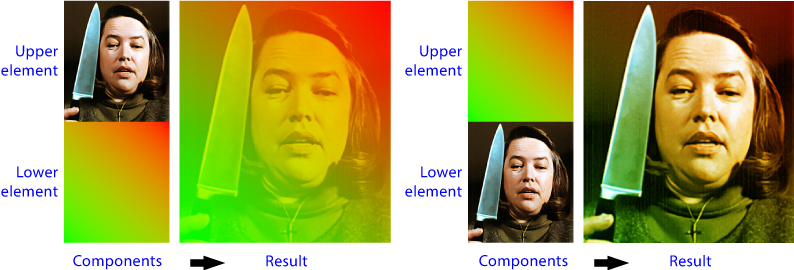
Color dodge
In this blending mode each of the channels is treated separately. The algorithm makes the Lower colour brighter depending on the brightness (i.e. a higher value) of the Upper colour.
Any blending with a white Upper object (value "1") produces white. Any blending with an Upper black object (value "0") it is as if it did not exist and the Lower colour is the Resulting colour.
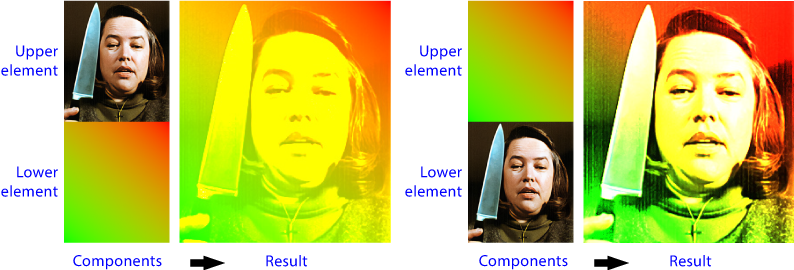
The blending mode that produces the opposite effect is "Colour burn".
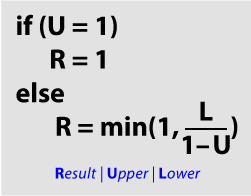
Color burn
In this blending mode each of the channels is treated separately. The algorithm makes the Lower colour darker depending on the darkness (i.e. smaller value) of the Upper colour.
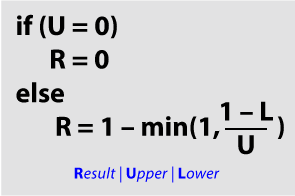
Any blending with an Upper black object (value "0") produces a Resulting black. Any blending with an Upper white object on top (value "1") behaves as if it did not exist and the Lower colour is the Resulting colour.
The blending mode that produces the opposite effect is "Color dodge".
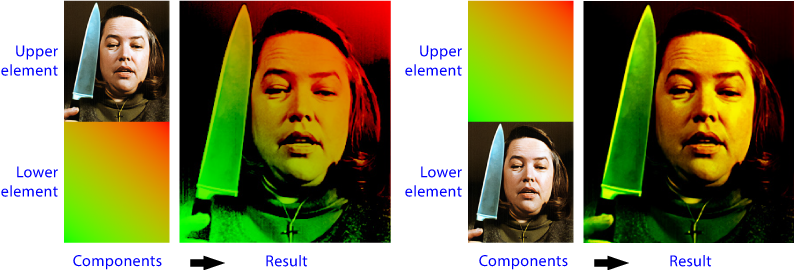
Difference
In this blending mode each of the channels is treated separately. The algorithm subtracts the darker colour from the lighter colour of the two components. Basically, what is produced is a tonal inversion.
Any blending with an Upper plain white (value "1") produces a perfect negative (inversion) of the Lower values below, and any blending with an Upper black object (value "0") behaves as if it did not exist and the Lower colour is the Resulting colour.
The stacking order does not matter if the opacity of the Upper object is set to "100%".
But if the opacity is changed, the effect is very different depending on the stacking order.
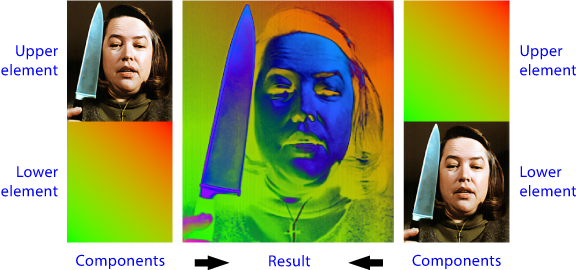
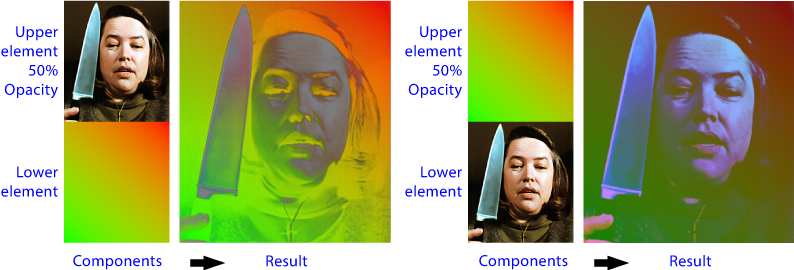
Exclusion
In this blending mode each of the channels is treated separately. What the algorithm does is a tonal inversion very similar to the "Difference" mode but softer and with less contrast.
As in "Difference", any blending with an Upper plain white (value "1") produces a perfect negative (inversion) of the Lower values below, and any blending with an Upper black object (value "0") behaves as if it did not exist and the Lower colour is the Resulting colour.
If we superimpose an image in "Exclusion" mode over itself, the effect is some kind of solarization, as seen above (in “Difference” the result would be just Black).
The stacking order does not matter if the opacity of the top object is set to "100%".
But if the opacity is changed, the effect is very different depending on the stacking order.
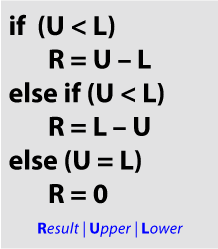
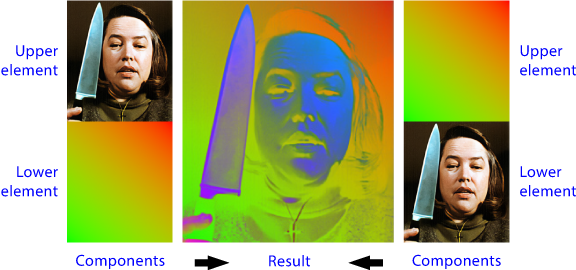
Non-separable modes
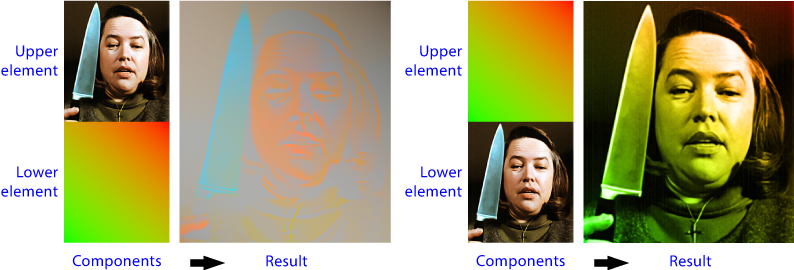
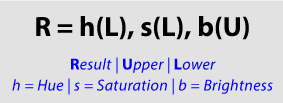
The following four blending modes (Hue, Saturation, Colour and Luminosity) are "non-separable" blending modes. In these modes, the colour channels are considered together, not separately. That is, the colours are judged by transferring the compound values to the HSB colour mode (Hue, Saturation, Brightness) and there, the corresponding algorithm is applied. Then the Resulting colour is returned to the original mode (usually RGB).
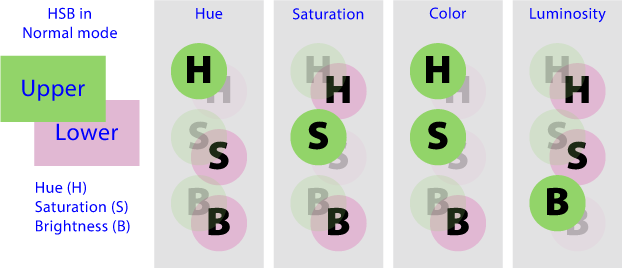
The above picture summarises the difference between the four "non-separable" blending modes.
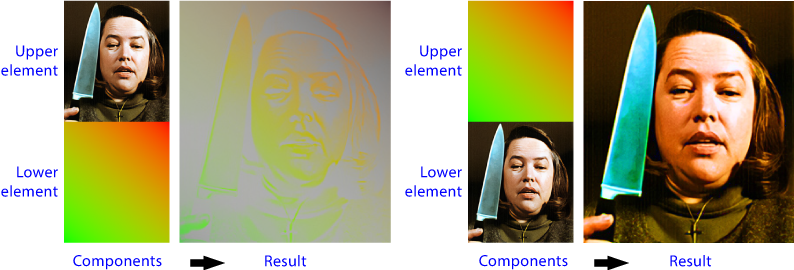
Hue
In this blending mode, the Upper and Lower colours are translated into the HSB colour mode.
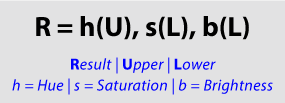
The algorithm consists of combining the Upper Hue with the Lower Saturation and Brightness. The Resulting colour is returned to RGB.
If the Upper colour is a neutral colour (i.e. all its three components are equal), the result is that the image underneath becomes neutral (i.e. greyscale-like).

Saturation
In this blending mode, the Upper and Lower colours are translated into the HSB colour mode.
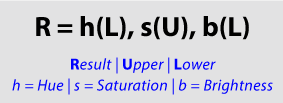
The algorithm consists of combining the Lower Hue and Brightness with the Upper Saturation. The Resulting colour is returned to RGB.
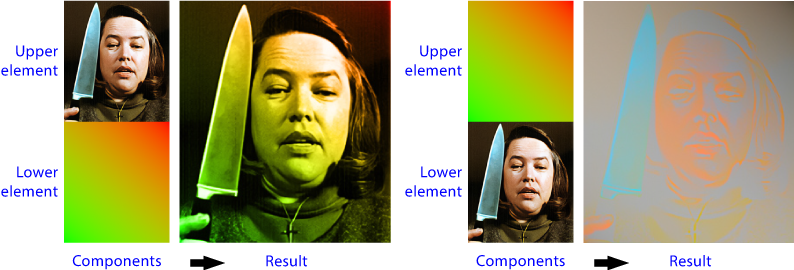
Color
In this blending mode, the Upper and Lower colours are translated into the HSB colour mode.

The algorithm consists of combining the Uper Hue and Saturation with the Lower Luminosity. The Resulting colour is returned to RGB. "Color" has the opposite effect to the blending mode "Luminosity".
Luminosity
In this blending mode, the Upper and Lower colours are translated into the HSB colour mode.
The algorithm consists of combining the Lower Hue and Saturation with the Upper Brightness. The Resulting colour is returned to RGB. "Luminosity" has the opposite effect to the blending mode "Color".
PDF and non-standard blending modes
The main design programs capable of creating PDF documents that maintain transparencies without having to rasterise elements (Adobe InDesign or Illustrator, for example) do not have non-standard blending modes. It is therefore not possible to design a document with native objects (i.e. not imported objects, such as photographs, for example) that contain non-standard blending modes.
If they incorporate an external object with a non-standard blending mode (a Photoshop image, for example), when creating a PDF, the programs rasterise the conflicting elements into a flattened pixel object with the effect applied and removed.
This is also what Adobe Photoshop does when a user wants to save an image as a PDF if it contains an element with a non-standard blending mode applied.
[© Gustavo Sánchez Muñoz, 2026] Gustavo Sánchez Muñoz (also identified as Gusgsm) is the author of the content of this page. Its graphic and written content can be shared, copied and redistributed in whole or in part without the express permission of its author with the only condition that it cannot be used for directly commercial purposes (that is: It cannot be resold, but it can form part as reasonable quotations in commercial works) and the legal terms of any derivative works must be the same as those expressed in this statement. The citation of the source with reference to this site and its author is not mandatory, although it is always appreciated.